This blog started as a journal of implementing a 20% time project in my Anatomy and Physiology classes, then it evolved into a blog on all sorts of things I tried in my class. Now as a TOSA, this blog is evolving yet again. I will use it to showcase a variety of instructional strategies and edtech tools that educators can use. This blog will partner with my 1CoolThing YouTube Channel. Additionally, it will also serve as a place to reflect on my role as a TOSA.
The only difference in this model is that the class period would start with whole-class direct instruction, and then segue into the rotations stations.
If you currently spend a large chunk of class time lecturing and going over practice examples, this might be an ideal first step into the station rotation model.
How it works:
In a 90 minute block, this would translate to 15 minutes for direct instruction, 15 minute stations each, and then 30 minutes total at the front and back end for warm ups, recap, and clean up.
Start by streamlining your instruction to be 15 minutes or less, and just content. Minimize the Q&A time because this will come out in the stations. Then, push the practice and examples to the stations. As I described in the previous post, you as the teacher can be in one of those stations doing the practice with student and giving them more personalized formative feedback. Here you can reteach as needed.
The other stations allow students to engage with the content in other ways (individually and collaboratively, online vs. offline, speaking/listening and writing, etc.). See my examples in the previous posts for ideas of what you could do, and subject specific examples.
This is blog post 3 of 4 on station rotations. Previously I wrote about splitting the class in two, cycling for example between online and offline activities. That was followed up by my second post that involves the teacher pulling students out one at a time to conference and give specific formative feedback. Again, shoutout to Catlin Tucker who was the inspiration behind these posts.
This post builds on the two station rotation models and fully forms a third station around the teacher. In this model the class is broken into thirds and the teacher plays an essential role in that station. In this setting the teacher could be giving small group instruction, small group practice, and/or specific feedback.
The Stations:
I would again refer you back to the first post in this series about the two station rotation model. The two stations without the teacher could be an online vs offline pairing, or an individual processing vs collaborative group dichotomy.
It's important to make sure the three stations can function independently of one another since kids will be starting at each of the three.
The Role of the Teacher
While the teacher can certainly use this opportunity to give direct instruction, I would strongly encourage the teacher to do less talking AT the students, and more talking WITH them in this group. Let's take some things you might do normally in class, that you could do in this small group.
Instead of.... try.....
Instead of a whole class discussion, try having the discussion in the station. Let's be honest. Most class discussion are really just a handful of kids talking with the teacher. More students are silent than speaking. In a small group you will hear from more students, and different things might come up in different groups. What's more, you could always share out at the end with the larger class.
Instead of doing practice problems with the class, try doing those in your teacher station. Even if it's the EXACT same thing you would do with the whole class, going over practice problems in a smaller group is more accessible and engaging for students. It will feel like a tutoring session rather than a lecture, and you'll be able to give them better formative feedback.
Instead of lecturing at all, try using the your valuable time with students to help them understand the material rather than just give them the material. Use the other stations, or homework, to expose them to the new content. Whether that's a video lesson, a reading assignment, or prior research, have students become exposed to the the content prior to class, and then use your time with them to help UNDERSTAND that material. You probably know what the common misconceptions are, so use this time to address them.
My personal experience I try to keep my writings on these topics as subject agnostic as possible, but that might come across as vague sometimes. So here's an example of how I would do this in my Biology class.
Homework: Students watch vodcast (10 min video lesson on photosynthesis) all centered around the driving question: How can a tree grow so tall? Students take notes at home, and complete a short non-graded Check for Understanding (CFU) Quiz. In class, students start with a 10 minute warm up- questions reflecting on what was learned last night. Then we break into stations.
Stations:
Individual Processing: I would have students create a model (in NGSS speak, this is a diagram or drawing) answering the driving question. Essentially this is outlining the process of photosynthesis. This would be paired with a Flipgrid discussion post asking them to describe in 1-2 minutes the relationship between structure and function in photosynthesis and how that helps us answer our driving question. They will use the diagram they created to support their explanation. If needed, students can step outside to record their video real quick. In the next class I would use the new AR feature to embed that video on their notebook page (look for a blog post on this later).
Small Group Work: In this step I would have them do a small mini-lab or demonstration. This could be a virtual lab on photosynthesis like this one, or something like the leaf disc activity. They would do a quick CER statement based on the results of their mini-lab.
Teacher Station: In this station I would have them sit near my whiteboard where I would have diagrams of photosynthesis. I would use this time to ask them questions, give them feedback, and even put them in the role of teacher to explain to me and the group what was happening. They could sketchnote as we go.
End of the period recap: The last ten minutes I would have students put the room back together, turn in their work, and complete an exit ticket called a 3:2:1
3:2:1 Exit Ticket:
On a piece of scratch paper write:
3- Three essential understandings about photosynthesis.
2- Topics or ideas you are still struggling with.
1- Question you (still) have.
Some final thoughts:
In my opinion, a station rotation lesson like this would be highly student-centered. They would be pushed to think, work collaboratively, and engage with a challenging topic in a variety of ways.
The lesson is not completely dependent on technology (it's merely used to enhance, add accountability, and promote student voice).
Students get verbal formative feedback from the teacher.
Students are doing lab work, and relating concepts learned to empirical data collected. Plus, since the lab part is just a station I don't have to set that lab up for 8 student groups, which makes it easier to set up and tear down.
And lastly, they're not in their seat the whole time. They're getting up and moving at least three different times, and in the case of the lab work, might be up on their feet the whole time.
I think an approach like this opens so many possibilities. How could you use it in your own context?
Stations are not just for elementary school! Stations are a great way to break up a class period by providing the opportunity for students to interact within our courses in multiple modes. In my previous post I discussed a variety of options one could do in a two station rotation (read the specifics here), but basically you can have students flip between online and offline activities, reading vs writing, independent work vs. collaborative work, and much more. Shoutout to Catlin Tucker who has been my inspiration for posts on these topics.
In my previous post I said that the role of the teacher was to either bounce between the two stations, or spend all of their time at one of the stations. This variation actually makes a separate station where the teacher calls students up for a short conference.
Role of the Teacher What is the role of the teacher in the classroom?
Our role is becoming less the keeper and deliver of content, and more the facilitator of learning. We help student understand the challenging material. We bridge gaps. This station model creates an opportunity for us to give formative feedback, target instruction, and give the individual attention students need.
How it works:
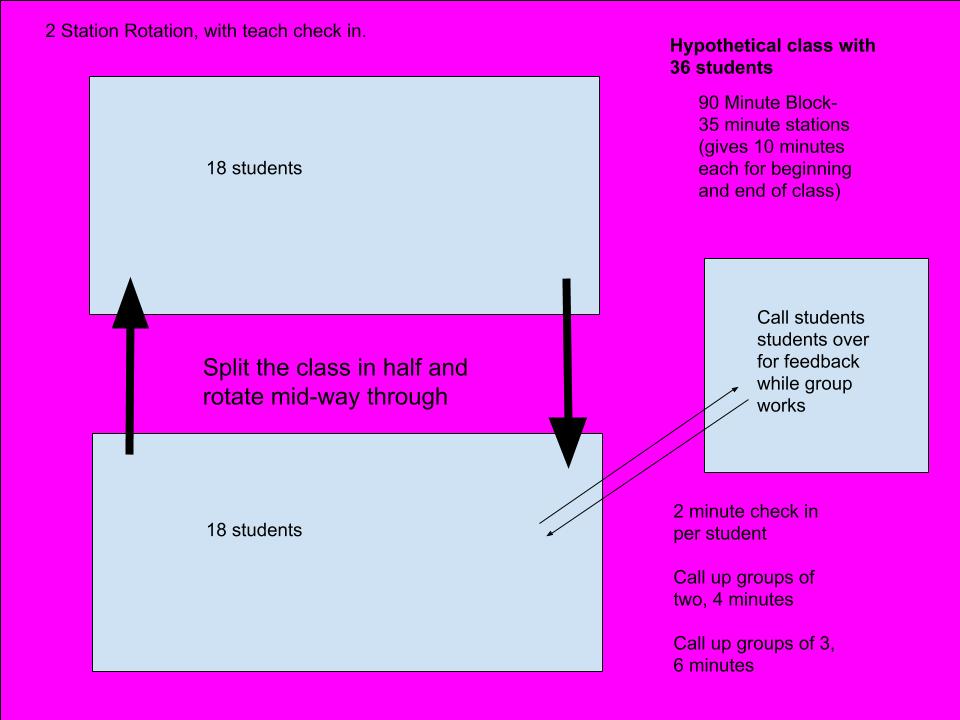
Split the class in two halves (again, see previous post). The teacher then sets up at a neutral location, ideally somewhere they can still see the two groups and kind of make sure they are staying on task. If students are on laptops, it's probably a good idea have them turned in a way such that a quick glance will show whether they are on task or not.
In a hypothetical 90 min block period with 36 kids, this would give the teacher about 2 minutes per student. If the teacher called two students up together, that would be 4 minutes. Smaller classes mean you more time. Two minutes may seem really quick, but if properly targeted, that may be all you need! If you're not doing this now, ANY one-one time is better than none.
What does the teacher do in the conference?
It's all about individual attention. It's about formative feedback. Here are just some ideas, organized by subject, but really these are interdisciplinary ideas.
ENGLISH: Specific feedback on their writing. You and the student pull up an essay they are currently working on (perhaps student are writing the essay in one of the stations), and you give specific feedback then and there on a specific element of the essay. Do it now, and you don't have to do it later when they turn the essay in!
MATH: Working a problem together. Have students work a problem or two in front of you allows you to see their process and give them specific advice and feedback. Perhaps here you go over some recent quiz results, or give them some insightful hints that will help them remember the challenging material.
SCIENCE: Lab Report. Grade a lab report with the student right there! The day following a lab do a station rotation and have the student come up read the lab report with them right there. Score on the rubric as you verbally give them their feedback. Help fill in the gaps, reinforce the essential learning of the lab, and SAVE YOURSELF TIME GRADING later!
WORLD LANGUAGES:One on one conversation. This one seems the most obvious. The best way to learn a language is to speak and listen in the language, especially with a fluent speak who can give immediate feedback. You as a teacher can easily do this in a couple minutes with 1-3 students.
SOCIAL STUDIES: DBQ: Review a DBQ they recently wrote. Give them specific feedback on what they wrote and how they could have done it better. Similar to the science example above, grading it with them will save you time later, and give them much more meaningful feedback. English and PBL examples also apply to SS.
For the Project Based Learning Class: Have a check in on their progress. Ask them: What have you been working on?What problems have you encountered and what have will you do to resolve them?What are your next steps? This check in is a great way to build accountability and help students continue to make progress while also getting the feedback they need from you, the teacher.
This is just the beginning. It's a protocol. Once you and your students get comfortable with the protocol, you could literally drop in any two activities for the the two halves, and there are many different strategies you could take during that conference time with students.
At the heart of this approach is giving students personalized individual instruction or support. Feedback is only valuable to students if it can have an IMMEDIATE impact on their next steps. This station rotation model allows you the teacher to give students feedback they can immediately use to be successful in your class.
What's more, if you're using this approach to grade or give feedback in class, you can actually save yourself time grading in the future because you either did the grading with them or because you're not having to give them the feedback on the back end (which also is too late anyway).
Check out my next post on the 3 station rotation...
Stations are not just for elementary schools to use. Stations work in secondary too, especially in the context of long block periods. This is the first in a 4 part blog post series on ways of implementing and tailoring station rotation to various types of classes. I was inspired to write these posts after listening to Catlin Tucker's Fall Cue Keynote where she pushed teachers to use station rotations more often as a way to blend online with in person work, and streamline workflow to engage students while also creating balance for the teachers. Her talk really resonated with me my evolution as a teacher, and really inspired me to elaborate on it more and share with the teachers I serve in LGSUHSD. So, check out the next 4 posts and try one or all of them!
The Two Station Rotation
The graphic above shows what it looks like generally, but read below to see the many ways it could be personalized and adapted to your subject, and day to day.
Role of the Teacher
Depending on the two stations, the teacher could be alternating between the two stations or be spending most of their time at one. The point is for the teacher to take advantage of the learning opportunities that have been created to check in with students and give them the feedback they need.
How to split:
Splitting is simple. Split the class in half by either drawing a line down the middle of the room and splitting them, or count the kids off by two. You can even predetermine who you want in the groups. Have students move the desks so there's clearly two halves.
What can you do in the two halves?
Online vs Offline
Students should not be on computers an entire period. Nor should students never work on the computers. It's about a blend of the two, and harnessing online and offline content together you will get the most out of your students and class time. If you have computers, one group can be doing work online, while the other group can be doing something offline/analog.
Types of online work:
Content delivery: students watch a video and take notes (this could be your own screencast, someone else's, or some other video. Make sure students have headphones if they will be watching a video
Online discussion: Have students complete an online discussion such as Canvas.
Flipgrid: Students answer discussion questions on Flipgrid. In this case, these students might go outside to record their responses.
Writing: Students are working on an essay, DBQ, project, lab report, etc.
Working with manipulatives or other kinesthetic activities.
Practice Problems
Anything really.
Reading vs Speaking/Listening
Have students read an article, book, or textbook. Silent sustained reading is crucial and something they probably don't do much of at home. Perhaps have students go outside (within eye sight of the room), find a quiet place, and read for a bit. Those students inside are up out of their seats talking about prompts you have created. Perhaps you're using some of the discussion strategies I've blogged about before.
Writing vs. Listening
Say students are working on a project or essay, but you still have content to deliver. Split the class in half. One half continues to work on their project or essay, while the other half joins you for your direct instruction. Students listen to you, take notes, and potentially have more opportunity to ask questions. You also have the opportunity to call on students more frequently, and check for understanding easier.
If this sounds like you will be doubling your lecturing, you will. Perhaps it's something you could screencast and students could watch and listen to prior to class, or as a separate station, thereby freeing you up for helping them with that understanding rather than just delivering content. Something to think about....
Collaboration vs Individual Work
Students need to be BOTH collaborative members of a team and able to work independently. So why not split the class into those two groups? Types of Collaborative Work:
Projects
Labs
Collaborative Essays
Poster Paper Presentations
Types of Independent Work:
Essay writing
Lab report writing
Journalling/blogging/reflecting
Reading
Practice Problems
Any of the online/offline items listed above
The two station rotation has endless opportunities for variety. Pick any two activities that would provide value in your class, and plug them in. Ultimately this shifts the focus to be more student-centered, while simultaneously freeing the teacher to do what they do best: help students understand and grow. Next see my post on how you can tweak this just slightly to give more personalized attention to students.
It's not about the technology; it's how you use it to enhance or transform your pedagogy. Google Forms can quickly give you this enhancement. Here are 7 quick but powerful ways to leverage Google Forms in the classroom to improve accountability, increase student metacognition, as well as help you grow as an educator.
Student tracking during independent projects:
Have a standing form that students complete in class to track what they’ve worked on, what challenges they’ve encountered, and what their next steps are. Variations can include having students complete at the start of class, and have a question that identifies if they need help from you. Use a color coding system: red- I’m stuck, I need your help, yellow- I’m having a hard time, but managing, green- I’m all good. Use this template to begin your own.
Unit concept checks
What are the essentials understandings of a unit? Do students know them? Are they asked to evaluate their understanding throughout the unit? Use this form as a template to 1) identify the essentials for a unit, and 2) have students rate their understanding. Have them complete this in the beginning, middle, and near the end of the unit for you and the students to identify gaps in their learning or understanding.
Tracking your own work
Ever wish you could capture some feedback at the end of a lesson for you to use in lesson planning next year? Have a quick form you complete at the end of a class as an organized way of reminding you next year. Use this form as a template. Bookmark it on your computer and complete at the end of a bad lesson, or set a reminder to do it once a week at a convenient time. Pull up the spreadsheet next year at the start of each unit.
Rubrics
While Canvas Rubrics are great for grading (We use Canvas in our district), they’re not the best for data analysis. Make your rubric a Google Form. You can complete the rubric as you grade. Each student gets a new submission. OR, you can have a TA, or even your students, input rubric data so you can analyze later. Give them the link to the form and have them complete it after you’ve passed back the assignment. Here’s an example of a DBQ rubric. Use it as a template to make your own. If you give a common assessment with colleagues, all of you can use the same rubric and then be able to compare your data with theirs to help calibrate your common assignments/assessments.
Exit Tickets (Including end of week)
Have students track what they’ve learned by completing an end of the week exit ticket. This helps them track what they’ve learned over the week, and collectively over the semester. It also helps you get some formative feedback. Use this template to make your own.
Assessment Debriefs
Did you recently give an assessment and want students to reflect? Use this template to have students reflect on how they prepared for the assessment and its relation to their performance. Help students learn from their mistakes in order to improve in the future. You could even use this as a way for students to earn some points back.
End of Semester Student Survey
Having students give us feedback can be a powerful way to improve as teachers. While it may feel scary because feedback can be critical and sometimes taken personally, if we can look at the data objectively and ask ourselves how can I improve as a teacher?, then we can and will be better for our students. LGSUHSD has been requiring all non-tenured teachers to administer a student survey as part of the reflective process since 2013. This practice helps inform them of how they can improve. Click on this link to make your own copy of the survey to give to your students. You can add any questions you’d like. NO ONE will see the data but you. (note this link will only work for teachers of lgsuhsd)
There are many many many more uses for Google Forms. Matt Miller of Ditch that Textbook has this post, 20 Practical Ways to Use Google Forms, and I definitely recommend you check it out if you want more.
If you follow me on social media, you might have seen my snarky tweet last week:
That was because PG&E had shut off power to my house because of the "Public Safety Power Shutoff" and they were being coy about when it would come back on.
Just a couple of days earlier our schools were told we may lose power, and principals at both schools sent emails notifying staff that we could lose power at schools, but school would likely be in session. In an email to all staff, Saratoga Principal Greg Louie wrote:
Tomorrow might be an opportunity to collect different kinds of evidence: teaching and learning without electricity!
We don't expect an outage to occur, but if we start the day without power or the power goes out during the school day, the plan is to keep teaching in classrooms and spaces with natural light. Please develop a backup plan if your instructional activities involve your projector, computer(s), internet, etc.
And so, teachers prepped for the next day preparing for a day without power (including no Internet). And that last line got me thinking.
Good teaching is good teaching. Do we really need power to be engaging and effective teachers? Technology is supposed to enhance, or even transform what we do, but I don't think it's always critical. If we're just substituting technology for something analog, ie something we could do without power, is it really worth doing?
And that got me really thinking:
What if you had no power or Internet, but could get it for just 20 minutes in your class? How would you use it? Would it enhance, or transform what you were doing without power?
Technology shouldn't necessarily be used every period, all period. An effective use of technology is one in which it is chunked, and blended with good instruction: lessons with high student interaction and engagement. Relevant learning experiences. Rigorous, but attainable, content.
Effective use of technology is one in which the tech is "invisible." This means that the teacher has created a learning environment so effective that it's not about the tech tool they're using. It's merely a means to end.
So let's use this (potential) inconvenience brought upon us by PG&E, and say no thanks to power being shut off, but thank you for sparking a thought experiment that helps us evaluate how, and why we're using technology in the classroom.
As you plan a lesson with technology, ask yourself some of these questions:
Why am I using this technology? What is the goal of my lesson that this tech helps facilitate?
Would my lesson be the same, or worse, if I had no power?
If I only had 20 minutes of power and Internet, how would I maximize those minutes to enhance my instruction and better support students?
I'm curious to hear what people did. If you planned a lesson sans power, did you teach that lesson anyway? Did you have any a-ha's as you planned the lesson? Would a lack of power even affect you? I'd love to hear your thoughts. Especially how you would use those 20 minutes! Please comment below.
Oh, and I got my power back Friday night. Thanks No Thanks, PG&E.
What happens if you don't have a positive or safe classroom climate?
How do you create an environment where you get the most out of your learners? What does that look like?
Yesterday I wrote a post outlining the Dysfunctions of a Team and how taking meaningful steps to build a positive classroom climate creates an environment where students feel safe in taking risks and are willing to go outside of their comfort zone and into the learning zone. I discussed how a practice of creating shared agreements can lay the foundation for the hard work of learning for the year.
1CoolThing is the idea of sharing and celebrating the great work that teachers do, in hopes that others may be inspired by those ideas, apply them in their own context, and (maybe) even transform what they do. Here's my TED talk on 1CoolThing.
1CoolThing Story
Today I want to share a 1CoolThing Story, an interview I recorded with Brian Elliott and Jennifer Lee. Jennifer is a biology teacher at Saratoga High, and Brian is a Special Education teacher also at Saratoga. Together they collaboratively teach two sections of biology. Before my role as a TOSA, I co-taught with Brian and we did a process at the beginning of every year called "Shared Agreements." When I transitioned to TOSA and Brian began working with Jennifer, they took the idea of a shared agreement and made it their own.
Last week I ran into Brian and he shared how they were implementing it in their class this year, and how incredible the process has been. When he described it to me, it sounded even better than what we did before. It's a perfect example of 1CoolThing. Anyway, I swung by their room the next day and took some pictures and videos of it in action. I asked if they would be willing to meet with me to share in a "podcast" format what they did, how they did it, and why. They agreed and what follows is their interview.
The video to the right is the podcast on YouTube--> You can also download the podcast and listen to it on anchor or spotify.
— Ms. Lee's Science Classes @SHS (@lee_science_shs) August 25, 2019
This was an experiment. See my next post on my reflection on this as a medium for sharing ideas. I'm curious to hear what you thought and if this is an effective method of sharing ideas.
If, after listening, and you want to try it yourself, here's a rough overview of how I did in my class. This is from my perspective, but what Brian and I did together was the exact same.
Creating a Shared Agreement
Acclimation
I liked to give students a couple weeks of class to acclimate to the rules, procedures, and expectations of the class. I also wanted them to have a lab under their belt, and several homework assignments, so they knew what the class was going to be like.
Reflection
Students came to class and I asked them to get a piece of scratch paper out. I asked them to write a list of things that bother them about classes, or don't work. This is their chance to complain. I open this to include group work. I say "Think about every group project you've ever been a part of. What didn't work? What caused those bad experiences? Write these down."
I then ask them to draw a line down the middle and on the right side, list things that have worked. Write a list of things that have worked. Things teachers have done that have worked for you: class formats, and actions that you personally have taken that have positively benefited you and your group.
Group Share
Next comes the share. Wrapping around the table (I always have students in groups of 4), one by one students share first their complaints, and then once they're done, they take turns sharing the positive. They share even if it's been said already.
Once they've shared, I ask them to discuss any overlap. I also say: "Now that you've been in my class for a couple weeks and you have a pretty good idea of what it's going to be like, what do you feel are the 5 most critical topics or behaviors your group needs in order be successful in THIS class. Choose one person and write that down on one person's sheet.
Group Share Out
Wrapping around the room I have students share from their table groups and I write up on the board. I now facilitate this in a way that combines comments if two or more groups are basically saying the same thing. We typically come up with a list of maybe 10 to 20 topics. I also add in things that are important to me as a teacher. This is a collaborative process that includes teachers, students, and even any support staff working in the room.
Here's a video of Brian and Jennifer doing this very step:
Making the Shared Agreement:
Here's the magic now: I tell them that the goal is to come up with 3-5 statements we feel are the most important items we can agree on. We will write them in the active voice: "We will....", We want to stay away from passive or ambiguous language. These are behaviors or practices we will do, not just something we "hope" we can do. We're committing to this.
Students share out, and with facilitation, we usually arrive at a good list that encompasses the most critical pieces they listed. I also point out that we're not perfect, and we might not always demonstrate these, but this we collectively commit to.
The last step is to have some students write them on a poster paper, and everyone signs it. We then post it on the wall.
Every time I do this, I am so proud of my students and what they come up with. It always makes me like a class more, and makes me more excited for the year.
It takes some trust building to build up to this. Students need some time to feel comfortable sharing these things with their group, and the class at large. Leading up to this we've done active listening activities, fun games like improv games, and other ice breakers.
This isn't a one and done activity. This hangs on the wall, and when students model these well, I like to point it out. Conversely, if they're falling out of alignment, I just remind them "hey we have this shared agreement. What can we do here to get back to what we initially sought to achieve." I find referencing back to the group shared agreement to be FAR more effective than reminding them of a bunch of rules I created.
Listen to the podcast! This is just how I did it in my classes. Brian and Jennifer have adapted it in a very creative way. Listen how they made it their own, and you can get ideas for your own.
Thanks for reading. As you'll hear in the podcast, Jennifer and Brian did this second semester. This year they're doing on day 3. I usually do it in week 3. You can do this at any point in the year. Especially when feel you class just isn't what you want it to be. Maybe you need to build a shared agreement? If you try, share with me on Twitter or in the comments. I'd love to hear how it goes!
Learning is a risky endeavor. You're doing something you've never done before, and that brings with it a certain element of fear or uneasiness. As teachers, we have to create an environment where students feel safe in taking that risk. An environment where they know if they stumble or even fail, they will be ok because that is part of the learning process.
I've had this poster posted in my room ever since I went through the Passage Works Institute's 5 Dimensions of Engaged Teaching Trainings. Creating an effective classroom culture is creating an environment where you can push students outside of their comfort zone to learn, but not so far as to be in their excessive risk zone.
Yet, if students don't feel safe enough to take those risks, you'll likely end up with kids unwilling or unable to engage in the class. They may never speak, be reluctant to do do the work, show signs of anxiety, or in a worst case scenario maybe even not come to class. Ultimately, they won't learn because they're in the "Excessive Risk Zone."
Every teacher has their own unique and wonderful way of building a classroom culture that supports student learning. Some methods are innate. These teachers just have "a way" of connecting with their students and making them feel comfortable. I'm always in awe of these great teachers. Some methods however, are more overt. In this case, teachers take deliberate action by building in activities, scenarios, and/or tasks that build this culture.
PLC
Earlier this summer I was at a Professional Learning Community (PLC) Training with colleagues from our district. One of the breakout sessions was on creating "Collective Commitments" among stakeholders before embarking on the PLC process. Here are my sketchnotes from the session if you'd like see more. Tim Brown described how and why many teams fail. He described the 5 Dysfunctions of a Team. Below is a picture from my notes.
A team, which I would include a classroom community as a team, will fail if there is a lack of trust (which comes from a place of invulnerability). A lack of trust leads to a fear of conflict (which comes from a place of a false sense of harmony). A fear of conflict comes from a lack of commitment in what the team is doing (which comes from unclear expectations). A lack of commitment leads to an avoidance of accountability or responsibility (which comes from low standards or unclear expectations). And finally an avoidance of accountability leads to inattention to results (which can come from a place of status or ego). As you can see in the diagram, the more we can mitigate or minimize those sources, the stronger our team becomes.
I argue that these 5 dysfunctions of a team within a classroom occur when a teacher has not adequately created the proper classroom culture for the team to perform (learn).
The antidote, is creating an effective classroom culture based on trust, empathy, and mutual understanding. One such tool in creating this is the Collective Commitment or Shared Agreement.
The presenter argued that the solution to this was creating a collectivecommitment early in the process. This was an essential first step because it ensured that all parties involved clarified the values that matter most to them, and then together through a process of sharing, combining, and distilling these down, the group could come to a group of short statements that everyone in the party would agree was their focus. In a sense these are norms, but in my opinion, better because they are more inclusive, specific, and a product of the group.
I had a bit of an "A-HA" during this presentation, because I have done this process in my classes. I originally learned about this from Laura Weaver and Mark Wilding's book 5 Dimensions of Engaged Teaching, and began implementing in all of my classes in 2014. Some of the classes I did this with where the Biology Courses I co-taught with my colleague Brian Elliott.
I've always felt I created a pretty effective classroom environment for learning, and I think this was in part because of who I am as teacher, but mostly because I always devoted a chunk of time in the beginning of the year for team building and getting to know one another.
Yet, once I began implementing the Shared Agreement process, the culture of my classroom community went to another level. Students from the beginning of the year felt engaged in the classroom community in a way they hadn't before. Groups were more collaborative during lab work. Kids were more likely to share out their ideas or ask questions than in previous years. They were more likely to take risks. Here's a tangible example: Students often don't raise their hand and answer a question unless the KNOW that they know the correct answer. But after doing this process I found students were more likely to take a shot at a questions they weren't sure of, because the class had a shared agreement that stated it was ok to take risks and make mistakes.
Since taking on the role as TOSA, Brian has been co-teaching with another biology teacher, Jennifer Lee. They are building on what we created in 4 years of co-teaching, and frankly, are going above and beyond what Brian and I ever did. Last week I checked in with them and they shared how they were doing the collective agreement process in their classes. It sounded amazing, and their methodology was super innovative. I even dropped by and took some pictures and videos of it in action.
I asked them if they would be willing to sit down for a 10-15 minute interview to describe their collective agreement writing process and how it's impacted their classes. They agreed, and I'm super excited to share it with teachers.
In my next blog post, I will share my interview with Jennifer and Brian, and then I will outline how to create a shared agreement in the classroom. You won't want to miss this.
Every spring a magical transformation occurs. No, I'm not talking about the flowers blooming, caterpillars breaking free of their chrysalis, or the weather warming. I'm talking about how students magically begin to forget basic things they SHOULD KNOW. Things like where the stapler is, or what to do if they're absent.
One spring, after being completely fed up with the frustrating questions, I began writing a list of the things students were forgetting that they should know from the beginning of the year. I wrote down all the things that were driving me crazy. I realized something though. It was really my own failure (an example of extreme ownership) that they didn't know these things in May. I hadn't made it enough of a priority because I fell into the same pitfall every year:
In an effort to "get going" with the content of the class, I would neglect the important relationship building and overview of the common processes of the class.
This would leave students not knowing essential processes, and would manifest by the end of the year in me getting frustrated by answering "stupid" questions about things they should know already. If I TRULY want them know know these things, I have to make time for them at the start of year. I have to emphasize them as being essential and give students the opportunity to prove they have the competency.
The Rookie Module is Born
So I made a list. I listed all the things kids don't know at the beginning of the year, but MUST know in order to be successful in my class. This broke down into two categories:
PhysicalLocations vs Processes/Routines
And given that this is a BLENDED class, that means locations and processes were not just physical, but online too. Here are some examples: Physical Locations:
Pencil sharpener,
Handouts
Classroom Materials: colored pencils, glue, scissors, etc.
Turn in Box
Fire Extinguisher
Online Locations:
All things Canvas: Where to find grades, announcements, etc.
How to find reliable sources
Digital Citizenship and how to cite sources properly using EasyBib
Important files/handouts
Classroom Routines and Procedures
What to do when students come to class (The Warm Up/Do Now)
Setting up and using the scientific notebook.
Vodcast recapper: the person who debriefs the group on the homework.
Expectations for lab work, safety, and clean up
Chromebook use: getting/returning them, appropriate use, assigned chromebook, etc.
Online Routines and Procedures
How to turn in assignments in Canvas
How to set up a blog
How to write a conclusion for a lab
How to post to an online discussion
How and when to communicate with me when they have a problem or need a letter of recommendation.
The Implementation:
Once I had my list, I decided to take the first 2 weeks of class time/homework the following year to set the tone for the year. I made my Rookie Module over the summer in Canvas. This would be a mix of physical and digital. In some cases it would be watching videos, in other cases it would be doing a scavenger hunt in class. Their homework would be certain elements of the module, such as setting up their notebook.
The plan was this: We would do virtually NO CONTENT to start with. Instead, they would work on the "Rookie Module" and learn all the locations and processes that were key to success. I would start by explaining they were all rookies, which was to be expected, but by the end of that time they should know everything in the Rookie Module. In other words: by the end of the first month they shouldn't be a rookie.
More Than Just Nuts and Bolts
The start of the year is more than just procedures and policies though. It has to be fun, and we need to build community so that all students can work well in the many collaborative assignments that will come throughout the year. The plan was that we would do SEL team building type activities to begin building connections between everyone. Each day would be a mix of connection building activities and working through their module.
The Rookie Quiz
All of this culminated in the "Rookie Quiz," a Canvas quiz that students had to take and pass with an 80% or higher before they can begin with the class content, and move away from the label as a Rookie. Students could take it as many times as needed to reach the minimum standard. This was a quiz that pulled from all of the aspects of the Rookie Module. I created question groups, and designed the quiz so it would randomly pull a certain number of question from a pool of questions. That way, no two quizzes were ever the same, so kids couldn't just game the system and take the quiz over and over until they passed. By the way, I didn't give them access to it until the last couple of days of our time on the module.
How did it go?
It went well. They bought into the idea, and worked diligently on all of the stuff. Because I made it a priority, and emphasized it's importance, they worked hard on it.
I have to admit, it was HARD not to get started with the course content. I desperately wanted to get going on the content. And since doing this now for several years, one year I succumbed to my own pressure and rushed the process. It backfired. That year's students were more rookie-ish throughout the year.
Taking the time, slowly building up, was MUCH BETTER in the long run. Because we laid a strong foundation for the year, we were far more efficient once we got into the content, and then continued throughout the year. Here are some particular benefits:
Kids always shuffle in and out of classes the first two weeks. It was much easier to get late added kids caught up.
We built a stronger community. Kids got to know each other, and we had greater connection throughout the year.
I spent far less time explaining things in the beginning, or throughout the year. It was all there.
Kids began policing themselves. If a kid asked a "Rookie Question" one or two months in, they would call each other out (or just help each other).
New students who joined the class mid way through the year, could do the rookie module and feel caught up quickly.
Various projects or discussions would sometimes reference back to it. For example, I would direct students back to the citing sources page when we started our first project.
And the million dollar question:
Were they still asking those "stupid questions" in May?????
Ahem.....well.......uh....... yes. There are always going to be those kids. BUT, I got far fewer questions like that, and like I mentioned above, I had the advantage of students policing each other by either just helping one other, or calling them each other out if they were asking a rookie question. I would never teach a class without having a Rookie Module.
Make Your Own Rookie Quiz, or Steal Mine!
The name of the game in teaching is to beg, borrow, and steal. So with that in mind, I want to give my rookie module to you. For our LGSUHSD teachers, or anyone who uses Canvas LMS, I have uploaded my Rookie Module into Canvas Commons. You can find it, import it into your own course and then make it your own. This includes the videos, documents, discussions, and even the quiz. Below is a video with two parts. The first is what's in the Rookie Module, and generally what it looks like. The second part, is how to find it in commons, and import it into your own course.
Every teacher has their own on-ramp work for the year. I'm suggesting you dig in a little deeper, and really go over the important locations and processes for your class. If you're reading this late in the year, make a list of the things that are driving you crazy right now. Put that in beginning of the year routine and try to prevent it from happening. Think about what things you do throughout the year and how much faster, if your students knew the tech steps from the beginning of the year, you could go? Taking the time at the beginning of the year to teach how to use an Online Discussion could make it possible for you to use the discussion repeatedly throughout the year and allow the students to focus on the discussion, not the tool itself.
Make your own Rookie Module based on the most important elements of your class. Explain why those are important, and help students develop proficiency in them. THEN, get started with your course content. I am certain you will be more efficient throughout the year and make up any "lost time" from the beginning. What's more, you might not look like this at the end of the year:
I remember when I was 13 years old spending the night at my friend's house and we logged in to an AOL chat room in an effort hopefully talk to some girls. WHO KNOWS who we were actually talking to, and thankfully it was completely harmless, but I remember at the time thinking it was so amazing that we could be chatting with someone anywhere on the planet. Those were the early days of the Internet.
Now we take these types of communication for granted as digital communication has become ubiquitous. I think many people associate online communication such as instant messaging, social media, comments on an online article, or online forums such as Reddit, as being some kind of devolved form of communication. No one uses proper grammar or punctuation. Everyone seems to be trolling one another or looking to prove something. And it's anything but better than real communication.
Yet, while in person communication is essential, I'd argue that online discussions can be potentially better than purely in-person communication alone, especially when the two are blended together.
What's more? Leveraging online discussions in the classroom and outside, teaches students important digital citizenship skills that will actually help them when they venture into those perilous digital communication platforms.
In this post I'd like to discuss ways a teacher can use an online discussion, and blend that with their own class discussions. Specifically, since our school uses Canvas, I'll discuss how to use the Canvas Discussion feature. Embedded are some 1CoolThing videos demonstrating how to do the nuts and bolts of the discussion.
Why Online Discussions?
As I eluded to in my intro, online communication is everywhere, so like it or not, online discussion is a common practice. As teachers, it's important for us to be current and relevant for our students. Beyond that though, here are the reasons I think we should consider using online discussions:
(Digital) Citizenship: Just like we teach our students how to behave, communicate, and generally conduct themselves in a group setting, we need to teach them how to do this in a digital space. How we behave in person should be the same online.
Online vs. In Person:Don't fall into the trap of thinking online discussion or in person discussions are mutually exclusive! You can do both, and there in lies the true power of online discussions. You can either extend a meaningful conversation from class into a digital one, or start a conversation online, and then go deeper in person.
Model Proper Use of Tech: We can model for students how to leverage technology in appropriate and powerful methods. Online communication doesn't have to be a bunch of arguing or sharing nonsense. We can have deep, thoughtful, and appropriate conversations online.
Go Deeper: In a previous post I wrote about how to promote greater equity in conversations. Near the end I discussed how to up the ante and push students to go deeper in their conversations. Well, using an online discussion tool can make a discussion much deeper because online discussions allow people to share links such articles and videos.
More Thoughtful and Accurate: Ever been in a discussion with someone and you feel like they're just making statistics up? Ever finish a conversation and think, "man I should have said...."? In an online discussion, you have time to think before commenting, and have the ability support what you say with links to sources. As a teacher, facilitating a discussion, you can require students to not only speak to your prompts, but justify with evidence.
Online Learning: Chances are high our students will take an online class one day. This will inevitably have online discussions. Let's prepare them for this kind of learning .
Nuts and Bolts: How to Do It:
First, since you have the rich text editor, you have the ability to embed videos, link to anything in Canvas or webpage, embed math equations, add photos/GIFs, and much more. Here's a video describing all the different things you can do with the Rich Text Editor.
Having all of these options allows you as the teacher to spark the conversation or give something thought provoking. Before doing an online discussion, you need to have a conversation about how to conduct yourself in on an online discussion. Then, you need to type the exact same guidelines in your instructions. My advice:
Be clear about how much or how little you want them to write.
If you want them to provide links, tell them.
If you want them to comment (which is kind of the point right?) Give them guidelines on how to comment appropriately. Here are my generic guidelines I use. I think I stole them from someone at some point (sorry!).
Remember the following when making posts:
All comments are appropriate and on topic. This is not a chat room. The same respect expected in person is expected online too.
All comments are written in complete sentences with correct conventions.
All comments follow the 7 tips:
Give a compliment (What was a good idea? Why?
Add new information
Make a connection to the writer
Advice or suggestion to the writer to help them meet their goals
End with a question
Proofread and sign your name
If a post already has three comments, you must choose another post to comment on. The goal is for each post to have at least three comments. Once you have posted 3 comments, and if everyone else's posts has 3 comments, then you may comment on another post.
Here's my video of how to create the Canvas Discussion:
Blended and Online Pedagogy
Remember, we're not using technology (in this case, and online discussion) just because we can. We're trying to enhance, or transform, what we do in ways that are better than what we could have done without the technology. Here are some pedagogical ways you can use online discussions.
1. Anticipatory Set:
Show a thought provoking video clip, GIF, or article. In science, this could be a phenomena. In math this could be counterintuitive equation/problem. In English or Social Studies, this could be thought provoking quote or passage. Ask students to interact with that content, and then share their thoughts. Setting the preferences such that they can't view comments before commenting themselves, minimizes the copy cat effect.
At the start of class, show these comments on your projector and discuss themes, misunderstandings, or whatever came up that you want to discuss. Use this as launching off point for what you plan to do for the day.
OR
Have students read and ask them to come up with themes or overlap. You can have them share in person in small groups, and then as a larger group. In this way you have started something online, and are now blending it into your class.
2. Formative Assessment: Just teach them something? Now use the Discussion feature to apply what they learned:
"Ok class, now go to the online discussion for the day and share an example of this concept in real life. This is your exit ticket, so do this before you leave today. Tonight for homework, you will comment on 3 posts. Use the guidelines on the discussion to make your comments meaningful and appropriate."
See how this can extend and blend what you did in class into the digital space? Not only can it be graded (ie accountability), but gives students opportunity to think and see what others are thinking. It builds community because they communicating with peers outside of class in appropriate ways.
3. Progressively Deeper Conversations and Work:
Similar to #1, give them something to read, watch or do, ahead of time. In terms of Blooms Taxonomy, have your prompts be something that is recall based or understanding. Then, get them into smaller groups in class. Print out the discussion, or have them read through the discussion on the computer for 5-10 min. This helps refresh their memory, and consider things they missed. A quick share out, with you highlighting the essential understandings, helps make sure everyone is on the same page. Now hit them with new prompts that require them to apply or analyze. Perhaps each group gets a different application or analysis with the same concept. An example of this could be a case study. Give each group a different case study. Ask them to discuss these in person and apply what they've learned. Here you as the facilitator can help them as they get into the more challenging work. Have students share out what came up in their discussions. Now everyone is learning from each other and reinforcing the foundational understandings. Perhaps this then transitions into an activity or longer term project that requires them to evaluate or create.
4. Video Discussions.
Discussions don't just have to be in writing. Depending on the goals of your assignment, maybe it's more appropriate to let students record a video of their comments. Maybe you want a video, with a link to a source. Maybe you want to give them the choice of writing or recording. Canvas Discussions allow you to record video within the discussion using the built in camera on the laptop. Same ideas listed above, but now you have a video component. You can also use FlipGrid for this kind of thing. I love Flipgrid. Here's a post I wrote about how to use Flipgrid. Hey it also links with Canvas. Hurrah!
5. Updates and Sharing Work
Are students working on a long term project? Want to know if they're making progress? Periodically, have them give a status update on a discussion. Have them provide a quick link as proof of their progress. They can also use this as an opportunity to pose challenges they're experiencing, and you can structure the process to have them comment on each other's posts and help them solve their problems.
At the end of the project, students can Share their final work and comment on each other's work. Online discussions are a great opportunity for students to share something they've done (eg a video, blog post, Google Doc, etc.) and then have classmates comment. Seeing other posts helps student gain a collective understanding of what others have done.
Moderating
A frequent question I've gotten is, "how do I moderate this?" or "What happens if students are writing inappropriate things?" To that I would respond, how do you moderate in-class discussions? What happens if a students says something inappropriate in class? Chances are you have rules in place in class, and it's just a matter of articulating to the the class that how they conduct themselves online should be no different than how they conduct themselves in class. Consequences should be the same. What's more, districts, including our own have some sort of acceptable use policy that all students must accept. Here's ours. If you're worried about it, perhaps you always link this in your discussions or at least spend time at the beginning of the year discussing it.
The Bottom Line
Thankfully we've come a long way since those early chat rooms. Now online forms of communication are everywhere and come in many forms. Our students are using them daily, and will continue throughout their life. It's not going away. We as teachers have the opportunity to leverage this technology in powerful ways. We have the creativity and knowhow to push students to think deeply. Whether it's engaging our students before they even come to class, or getting them to extend what they learn after they leave, online discussions can be a powerful tool in teaching. Why not use online discussions, in a blended manner, to push our student to go deeper and learn more?
Do you use online discussions? Have another idea of how to do it? Share your thoughts or ideas in the comments!
This week I co-taught a session on the new Respondus Lockdown Browser our district has adopted, with Julie Grenier. This will allow our students to take quizzes without being able to "research" the answers online while taking the quiz.
We offered multiple mini-PD sessions: Lunch and after school, at both sites, and in each case, teachers could also join as a Google Hangout. In total we served 21 teachers, which I think is pretty good. Many felt comfortable enough to try Respondus purely based on the how-to guide Julie had already created, and didn't feel they needed to come. Others expressed a desire to have a screencast video on how to do it.
This is the model of professional development that I'm advocated for, and I think we're moving towards: Differentiated, focused, and personalized in both modality and time.
In our sessions, many teachers weren't necessarily using Canvas Quizzes that much, and were asking really good questions like:
When should I use Canvas Quizzes?
When is better than a paper quiz?
Personally, I think Canvas quizzes should be used frequently, but have absolutely no impact on a student's grade, and give them opportunity to take it as often as they want. I wrote an entire post on these thoughts in my Performance, Feedback, Revision blog post last December, which I was actually quite surprised to find that Teacher 2 Teacher stumbled upon in the last month or two, and began sharing out on Twitter. I've received a lot great feedback from it.
Anyway, the conversations got me thinking how I should support teachers more on all things Canvas Quizzes. I went ahead and created the Respondus Screencast, but then created 3 more on how to create a quiz, how to add questions, and how to analyze the results. I whipped them all up into a simple infographic. Now we have a handy dandy how-to guide on creating Canvas quizzes, along with a link to my blog post.
Here's the email I sent to our staff today, along with the infographic below:


